Differenze tra le versioni di "AdminGuide:Procedures:IVRMenu/en"
(Creata pagina con "An IVR menu is configured by linking each button to an action from a drop-down menu and selecting one or more audio files to be played to inform the caller of their options....") |
(Creata pagina con "To configure an IVR menu, you must fill out the following fields: *'''Name''': alphanumeric menu identifier. *'''Main level menu''': only select this checkbox if this is the...") |
||
| Riga 17: | Riga 17: | ||
To configure an IVR menu, you must fill out the following fields: | |||
*''' | |||
*''' | *'''Name''': alphanumeric menu identifier. | ||
*''' | *'''Main level menu''': only select this checkbox if this is the main menu, otherwise leave it empty. | ||
*''' | *'''Audio file''': select the audio file that will be played when the caller accesses this IVR menu. The audio files must have been previously uploaded to the Sounds -> Audio files section. | ||
*'''Timeout (sec.)''': | *'''Repetitions''': select the number of times the audio message will be played before executing the predefined action. | ||
*''' | *'''Timeout (sec.)''': the time the caller has to make their choice. This is over, the PBX will either replay the message or execute the predefined action. | ||
*''' | *'''Predefined action''': select an audio message (optional) and the action to execute after the message has been repeated the configured number of times. | ||
*''' | *'''Allow dialing of selection number''': when this is selected, if the caller know the number of an extension they can dial it while the audio message is playing to directly contact the desired extension. | ||
*'''Selections''': for each phone button you can configure an audio message and one of the actions form the drop-down menu. | |||
[[File:menu_ivr2.png|350x112px|centro]] | [[File:menu_ivr2.png|350x112px|centro]] | ||
Versione delle 09:46, 27 feb 2018
Return to AdminGuide:Procedures
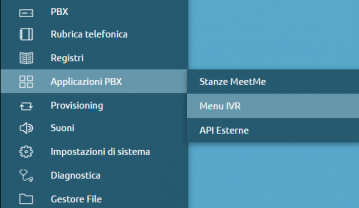
You can access the IVR (Interactive Voice Response) page from PBX applications. From there you can create a voice menu that an external caller can navigate by pressing the buttons on their phone. With an IVR menu calls can be forwarded to different destinations based on the options selected by the caller.
An IVR menu is configured by linking each button to an action from a drop-down menu and selecting one or more audio files to be played to inform the caller of their options.
To create a new IVR menu you must first acquire edit permissions by clicking on the ![]() icon in the top right, then select the Add IVR menu item.
icon in the top right, then select the Add IVR menu item.
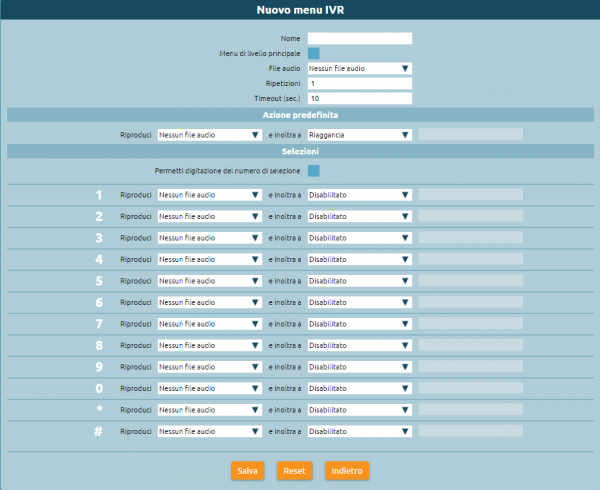
This will bring you to the IVR menu configuration page.
To configure an IVR menu, you must fill out the following fields:
- Name: alphanumeric menu identifier.
- Main level menu: only select this checkbox if this is the main menu, otherwise leave it empty.
- Audio file: select the audio file that will be played when the caller accesses this IVR menu. The audio files must have been previously uploaded to the Sounds -> Audio files section.
- Repetitions: select the number of times the audio message will be played before executing the predefined action.
- Timeout (sec.): the time the caller has to make their choice. This is over, the PBX will either replay the message or execute the predefined action.
- Predefined action: select an audio message (optional) and the action to execute after the message has been repeated the configured number of times.
- Allow dialing of selection number: when this is selected, if the caller know the number of an extension they can dial it while the audio message is playing to directly contact the desired extension.
- Selections: for each phone button you can configure an audio message and one of the actions form the drop-down menu.
Le azioni disponibili per ogni selezione sono:
- Riaggancia
- Piano di numerazione – Selezione personalizzata
- Piano di numerazione – Chiedi selezione
- Numero esterno
- Interno
- Gruppo di chiamata
- Gruppo di chiamata (salta controllo orario)
- Coda
- Coda (salta controllo orario)
- Menu IVR
- Casella vocale
- Stanza di audioconferenza
- API esterna
Una volta completata la configurazione del nuovo menu IVR cliccare sul tasto Salva per salvare in RAM le modifiche effettuate.
NOTA: Le modifiche sono state salvate in memoria ma non sono ancora operative.
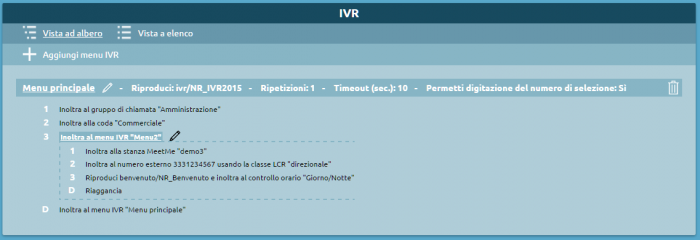
Una volta salvate le modifiche verremo riportati sulla schermata riassuntiva dell’IVR dove sarà possibile controllare l’albero IVR, completo di tutti gli eventuali sotto-menu.
Se l’IVR è quello desiderato è possibile quindi rendere le modifiche operative cliccando sull’apposito tasto Applica.


