Differenze tra le versioni di "AdminGuide:GettingStarted:VM:VMWare/en"
(Aggiornamento come da nuova versione della pagina di origine) |
|||
| Riga 10: | Riga 10: | ||
--> | --> | ||
<div class="mw-translate-fuzzy"> | |||
[https://areaclienti.vianova.it/drive/download/bmOBoFRXDaSlcH2K/ KalliopePBXv4_esxi5_bl-1.0.5-7156.ova] (md5: A3CE948432336DBEF32A68EE165005C1 - sha256: BB02938985BAE46641A33E4CC8D5FAB784AD9F54A72704C6010A6E949B63A202) | [https://areaclienti.vianova.it/drive/download/bmOBoFRXDaSlcH2K/ KalliopePBXv4_esxi5_bl-1.0.5-7156.ova] (md5: A3CE948432336DBEF32A68EE165005C1 - sha256: BB02938985BAE46641A33E4CC8D5FAB784AD9F54A72704C6010A6E949B63A202) | ||
</div> | |||
* [https://areaclienti.vianova.it/drive/download/BeWHIH36hbF12cM1/ KalliopePBXv4_esxi5_128vcpu_120GB.ova] (Disco 120 GB - MAX 128 vCPU) | |||
2. Import the downloaded image file into the virtual environment. Upon booting for the first time, the VM will start in '''recovery mode'''. | 2. Import the downloaded image file into the virtual environment. Upon booting for the first time, the VM will start in '''recovery mode'''. | ||
| Riga 16: | Riga 21: | ||
3. Access the predefined address 192.168.0.100:10080 from the GUI. If the OVA has bootloader version 1.0.5 or later, there is a console access (with manager/manager credentials) that allows you to change the IP address of the eth0 interface if it's not possible to access the predefined address. | 3. Access the predefined address 192.168.0.100:10080 from the GUI. If the OVA has bootloader version 1.0.5 or later, there is a console access (with manager/manager credentials) that allows you to change the IP address of the eth0 interface if it's not possible to access the predefined address. | ||
<div class="mw-translate-fuzzy"> | |||
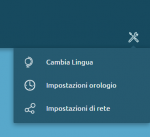
4. Go to the ''Tools menu'' (click on the [[File:Menu tools button.png|senza_cornice]] icon) in the top right to change your network configuration so that the PBX can access the internet and reach the license server. | 4. Go to the ''Tools menu'' (click on the [[File:Menu tools button.png|senza_cornice]] icon) in the top right to change your network configuration so that the PBX can access the internet and reach the license server. | ||
</div> | |||
[[File:Menu tools.png|150px|senza_cornice]] | [[File:Menu tools.png|150px|senza_cornice]] | ||
<div class="mw-translate-fuzzy"> | |||
5. Activate the KalliopePBX VM license with the activation key you were provided. | 5. Activate the KalliopePBX VM license with the activation key you were provided. | ||
</div> | |||
[[File:Attivazione licenza.png|350px|senza_cornice]] | [[File:Attivazione licenza.png|350px|senza_cornice]] | ||
<div class="mw-translate-fuzzy"> | |||
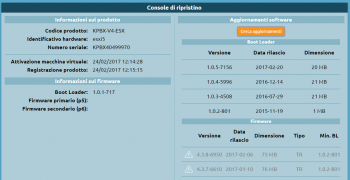
6. Once the license has been activated, click on "''Register product''" to access the '''Recovery console'''. | 6. Once the license has been activated, click on "''Register product''" to access the '''Recovery console'''. | ||
</div> | |||
[[File:Console_di_ripristino.png|350px|senza_cornice]] | [[File:Console_di_ripristino.png|350px|senza_cornice]] | ||
Versione delle 07:37, 12 set 2019
Return to AdminGuide:GettingStarted:VM
1. Download the KalliopePBX virtual image file. KalliopePBX VM is available in VMWare ESXi 5.x environment or later.
The OVA file can be downloaded at the following link:
KalliopePBXv4_esxi5_bl-1.0.5-7156.ova (md5: A3CE948432336DBEF32A68EE165005C1 - sha256: BB02938985BAE46641A33E4CC8D5FAB784AD9F54A72704C6010A6E949B63A202)
- KalliopePBXv4_esxi5_128vcpu_120GB.ova (Disco 120 GB - MAX 128 vCPU)
2. Import the downloaded image file into the virtual environment. Upon booting for the first time, the VM will start in recovery mode.
3. Access the predefined address 192.168.0.100:10080 from the GUI. If the OVA has bootloader version 1.0.5 or later, there is a console access (with manager/manager credentials) that allows you to change the IP address of the eth0 interface if it's not possible to access the predefined address.
4. Go to the Tools menu (click on the ![]() icon) in the top right to change your network configuration so that the PBX can access the internet and reach the license server.
icon) in the top right to change your network configuration so that the PBX can access the internet and reach the license server.
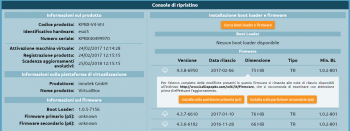
5. Activate the KalliopePBX VM license with the activation key you were provided.
6. Once the license has been activated, click on "Register product" to access the Recovery console.
7. Follow this procedure to update the bootloader to the latest version.
8. Once the update is finished, click "Restart bootloader" to restart the machine.
The machine will always restart in recovery mode.
9. Click "Find updates" again to download the list of available firmware updates and select the version you want.
10. Click on "Install on the primary partition (p5)". KalliopePBX will warn you that this will reset the partition erasing all data and ask for confirmation.
Since this is the first installation, confirm the request.
N.B.: Installing firmware from the recovery console will restore the machine to factory conditions. This can be useful when you need to completely reset a machine.
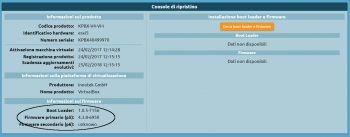
11. Once the firmware installation is finished, verify the firmware version number from the recovery console.
12. Open the tools menu and click on the "Shutdown menu -> Restart" item, select "Primary firmware" from the restart menu, and click "Restart".
13. After restart, you will be redirected to the main login (on port 80).
The default login credentials are
Username: admin
Password: admin
You are advised to change the password immediately after restarting.


