Differenze tra le versioni di "AdminGuide:GUI:UserMenu/en"
(Creata pagina con "Select the pencil icon on the top left to view all widgets: CDR statistics, user information, account status, ring groups, queues, services, function keys. By clicking and dra...") |
|||
| (24 versioni intermedie di 2 utenti non mostrate) | |||
| Riga 7: | Riga 7: | ||
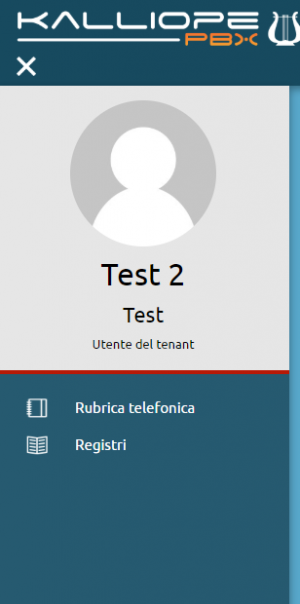
When accessing Kalliope as a user, you can view in the operating menu, on the left side of the the Kalliope interface, information on the logged-in user and access the configuration pages that the user has permissions to access. | When accessing Kalliope as a user, you can view in the operating menu, on the left side of the the Kalliope interface, information on the logged-in user and access the configuration pages that the user has permissions to access. | ||
As a tenant user, you can always view the phonebook and [[AdminGuide: | As a tenant user, you can always view the phonebook and [[AdminGuide:Service:CDR/en|CDR]] pages. If the tenant admin assigns you further permissions, you can also view from this menu the other configuration pages. | ||
You can also customize your dashboard with the information relevant to you. | You can also customize your dashboard with the information relevant to you. | ||
| Riga 13: | Riga 13: | ||
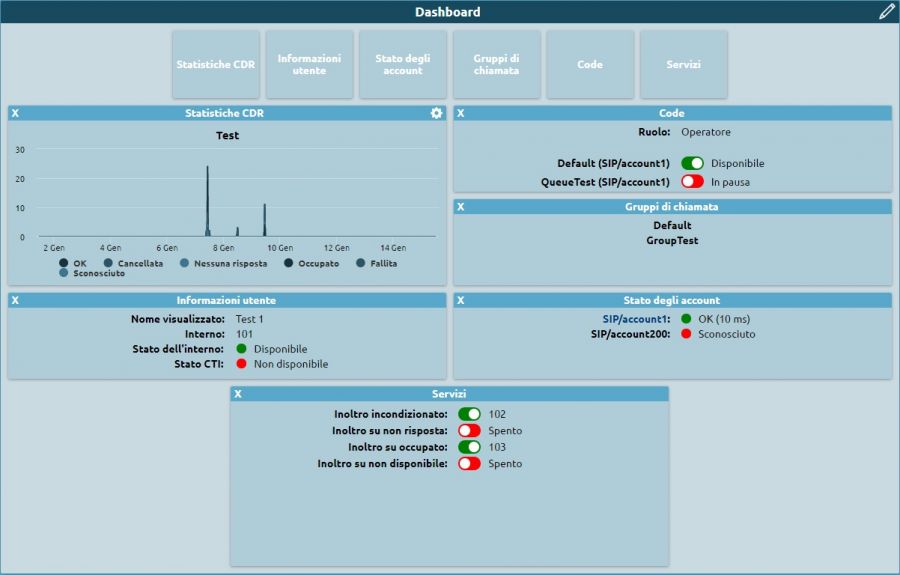
Select the pencil icon on the top left to view all widgets: CDR statistics, user information, account status, ring groups, queues, services, function keys. By clicking and dragging a widget to the space below you can make them visible, as shown in the picture below. | Select the pencil icon on the top left to view all widgets: CDR statistics, user information, account status, ring groups, queues, services, function keys. By clicking and dragging a widget to the space below you can make them visible, as shown in the picture below. | ||
[[File:Dasboard.jpg]] | [[File:Dasboard.jpg|900px]] | ||
== | == CDR statistics == | ||
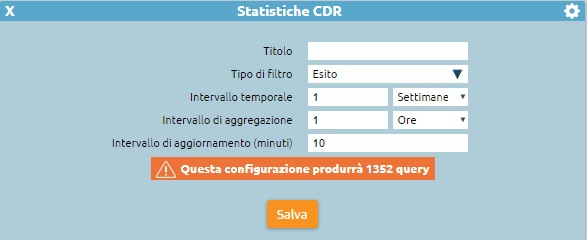
This widget displays a graph that summarizes the information in the CDR. You can set which information to display in the statistics. | |||
You can: | |||
* select the type of filter (outcome or direction); | |||
* insert a time span by inserting the number and selecting year, months, weeks, days, hours, or minutes; | |||
* insert the span with which the information will be grouped; | |||
* insert the number of minutes between updates; | |||
Click on "Save" to save and apply the settings. | |||
[[File:Statistiche1.jpg]] | [[File:Statistiche1.jpg]] | ||
== | == User information == | ||
This widget displays information on the logged-in user: | |||
* displayed name | |||
* extension number | |||
* extension status: green dot is available, red dot if unavailable, gray dot if suspended | |||
* status of the associated CTI: green dot is available, red dot if unavailable | |||
[[File:Info.jpg]] | [[File:Info.jpg]] | ||
== | == Account status == | ||
This widget displays the accounts associated with the extension and their status (green if active, red if not active). | |||
[[File:Account1.jpg]] | [[File:Account1.jpg]] | ||
== | == Ring groups == | ||
This widget displays the groups the user belongs to. IF the user does not belong to any groups, the widget will remain empty. | |||
[[File:Gruppi.jpg]] | [[File:Gruppi.jpg]] | ||
== | == Queues == | ||
This widget displays the queues the user belong to: | |||
* user role (operator or supervisor) | |||
* status of the user on the queue (available or paused) | |||
By clicking on the user status, you can change it. | |||
[[File:Code1.jpg]] | [[File:Code1.jpg]] | ||
== | == Services == | ||
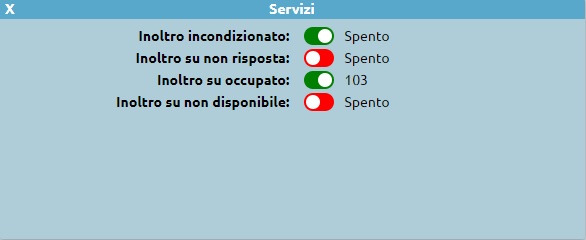
This widget lets you enable or disable certain services: | |||
* [[AdminGuide:Service:UnconditionalForward| | * [[AdminGuide:Service:UnconditionalForward/en|Unconditional Forward]] | ||
* | * Forward when not answering | ||
* | * Forward when busy | ||
* | * Forward when not available | ||
* Fork to Mobile | * Fork to Mobile | ||
[[File:Servizi.jpg]] | [[File:Servizi.jpg]] | ||
Forwarding services can be enabled by clicking on the red button and inserting the number to which you wish to forward calls and disabled by clicking on the green button. | |||
If you have an associated mobile number, you can view the Fork to Mobile status and enable or disable it by clicking the corresponding button. | |||
== | == Function key configuration == | ||
From this widget you can access the function key configuration pages if your extension is associated with a device. | |||
[[File:Tasti funzione.jpg]] | [[File:Tasti funzione.jpg]] | ||
You can set each function key to a service by clicking on the link. | |||
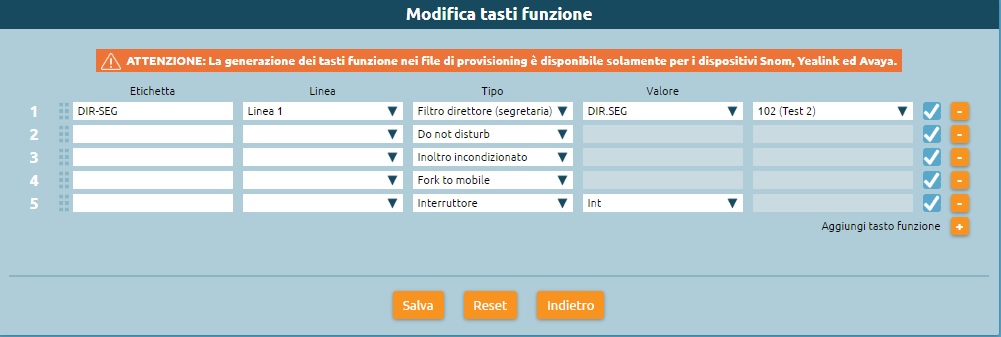
[[File:Funzione.jpg]] | [[File:Funzione.jpg]] | ||
To add a function key, select the "+" button, inset the name of label that will be displayed on you device, select the type of service (BLF, boss/secretary, speed dial, do not disturb, unconditional forward, fork to mobile, switch, or parking slot), insert the corresponding value if required, and save. | |||
After saving the settings, you can enable or disable the service with the phone buttons. | |||
Since unconditional forward requires an extension number to be inserted, you can only disable and not enable it from you device. | |||
Versione attuale delle 16:09, 20 apr 2022
Return to AdminGuide:GUI
When accessing Kalliope as a user, you can view in the operating menu, on the left side of the the Kalliope interface, information on the logged-in user and access the configuration pages that the user has permissions to access.
As a tenant user, you can always view the phonebook and CDR pages. If the tenant admin assigns you further permissions, you can also view from this menu the other configuration pages.
You can also customize your dashboard with the information relevant to you.
Select the pencil icon on the top left to view all widgets: CDR statistics, user information, account status, ring groups, queues, services, function keys. By clicking and dragging a widget to the space below you can make them visible, as shown in the picture below.
CDR statistics
This widget displays a graph that summarizes the information in the CDR. You can set which information to display in the statistics.
You can:
- select the type of filter (outcome or direction);
- insert a time span by inserting the number and selecting year, months, weeks, days, hours, or minutes;
- insert the span with which the information will be grouped;
- insert the number of minutes between updates;
Click on "Save" to save and apply the settings.
User information
This widget displays information on the logged-in user:
- displayed name
- extension number
- extension status: green dot is available, red dot if unavailable, gray dot if suspended
- status of the associated CTI: green dot is available, red dot if unavailable
Account status
This widget displays the accounts associated with the extension and their status (green if active, red if not active).
Ring groups
This widget displays the groups the user belongs to. IF the user does not belong to any groups, the widget will remain empty.
Queues
This widget displays the queues the user belong to:
- user role (operator or supervisor)
- status of the user on the queue (available or paused)
By clicking on the user status, you can change it.
Services
This widget lets you enable or disable certain services:
- Unconditional Forward
- Forward when not answering
- Forward when busy
- Forward when not available
- Fork to Mobile
Forwarding services can be enabled by clicking on the red button and inserting the number to which you wish to forward calls and disabled by clicking on the green button.
If you have an associated mobile number, you can view the Fork to Mobile status and enable or disable it by clicking the corresponding button.
Function key configuration
From this widget you can access the function key configuration pages if your extension is associated with a device.
You can set each function key to a service by clicking on the link.
To add a function key, select the "+" button, inset the name of label that will be displayed on you device, select the type of service (BLF, boss/secretary, speed dial, do not disturb, unconditional forward, fork to mobile, switch, or parking slot), insert the corresponding value if required, and save.
After saving the settings, you can enable or disable the service with the phone buttons.
Since unconditional forward requires an extension number to be inserted, you can only disable and not enable it from you device.
