Differenze tra le versioni di "AdminGuide:Service:HighAvailability/en"
(Creata pagina con "==Description==") |
(Creata pagina con "Return to AdminGuide:Service") |
||
| (Una versione intermedia di uno stesso utente non è mostrata) | |||
| Riga 1: | Riga 1: | ||
<languages /> | <languages /> | ||
Return to [[AdminGuide:Service/en|AdminGuide:Service]] | |||
==Description== | ==Description== | ||
High availability aims to increase the performance of the VoIP system by bringing together two physical nodes or two virtual machines that work together in active/passive mode. | |||
Only one of the two PBXs is active in a specific moment, while the other is on standby and is ready to take over call service when the passive node fails. | |||
There is no retention of calls in progress during transferring resources from one node to the other | |||
By design, the failure that a high-availability system intends to handle is a complete shutdown of the active node's functionality at that time: | |||
* natively there is no case of monitoring service if it is not actiive, as instead happens in other redundancy mechanisms where the node is considered degraded, even if one of the services is not active | |||
* | * unpleasant episodes can happen if the two nodes that are part of the cluster, lose their sight of each other, because each of them is convinced to be the only one and therefore activates, causing a "split brain" situation | ||
* | The High availability panel is accesible only to the admin or in case of Multitenant machine, to the PBX Admin. | ||
==Configuration== | |||
We have to go to Settings > High Availability Status | |||
This takes us to the '''High Availability Configuration''' page. | |||
[[File:Conf AA.png|600px|centro]] | [[File:Conf AA.png|600px|centro]] | ||
You can change system's status as "Enabled as Coordinator" or "Enabled". | |||
For example, we can choose "Enabled as Coordinator" for a node to keep as coordinator and select (from another browser tab) another node as "Enabled", which will act as a secondary and receive the configuration from the other node. | |||
===Network settings=== | |||
[[File:AA Impostazioni di rete.png|750px|centro]] | [[File:AA Impostazioni di rete.png|750px|centro]] | ||
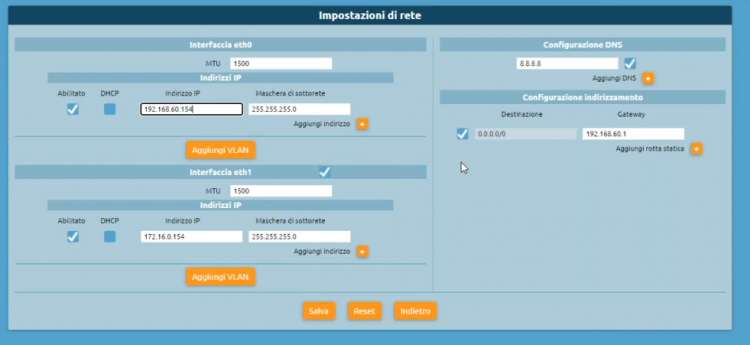
For a complete configuration, you need to go to Settings > Network settings and check that two network interfaces are configured for high availability, checking their own IP address. | |||
The two interfaces are connected to the same virtual switch that has no public interfacing. It has a single DNS configured and a route. | |||
===High Availability Configuration=== | |||
Service Configuration (Abilitato come coordinatore) | |||
[[File:AA Configur dett.png|600px|centro]] | [[File:AA Configur dett.png|600px|centro]] | ||
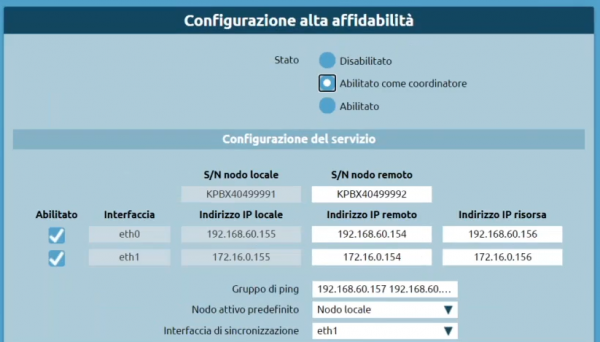
* '''S/N remote node''': it's the serial number, the first communication between the two exchanges (coordinator and secondary node) works with an interactive SSH session, in which you have to insert user and password for autentication. The password is calculated from the serial number of the machine. So the coordinator node needs to know the serial number of the other node to get the password to connect with and provide the necessary commands | |||
* '''S/N | * '''Enabled''': you can choose which service to configure on one or both of them | ||
* ''' | * '''Interface''': it is possible to see all the network interfaces present on the machine | ||
* ''' | * '''Local IP Address''': you can see which is the local IP address | ||
* ''' | * '''Remote IP Address''': you can view the remote IP address. | ||
* ''' | * '''Resource IP Address''': it's the IP address that will be acquired and shared on a given interface | ||
* ''' | * '''Ping group''': you can insert the IP addresses separated by spaces and they will be the nodes that each of the two will ping periodically to check which one sees more of them | ||
* ''' | * '''Synchronization interface''': you can insert a chosen interface that will be used for synchronization of data and logs between the two nodes (e.g. eth1) | ||
* ''' | * '''Default active node''': you can choose which of the two nodes should acquire the default resource in case of indecision. | ||
* ''' | |||
===Advanced settings=== | |||
[[File:AA Impostazioni avanzate.png|600px|centro]] | [[File:AA Impostazioni avanzate.png|600px|centro]] | ||
* '''Timeout keepalive - warning threshold (sec.)''': this is a threshold after which a warning is generated (at the moment only in the logs) | |||
* '''Timeout keepalive | * '''Timeout keepalive - out of service (sec.)''': this value defines after how long the node is not communicating with the other node, it must be assumed that it is inactive, and therefore if the other node may acquire resources | ||
* '''Timeout keepalive | * '''Initialization timeout (sec.)''': this value guarantees a specific number of seconds before deciding to acquire the resources (if there is already an active node). The higher the value, the more time the machine will take at startup to become operational because both nodes wait for this time | ||
* ''' | |||
By pressing "Save and start service" you can save the setting to the database and the high availability can start. | |||
==High Availability Status== | |||
[[File:Stato alta aff.png|600px|centro]] | [[File:Stato alta aff.png|600px|centro]] | ||
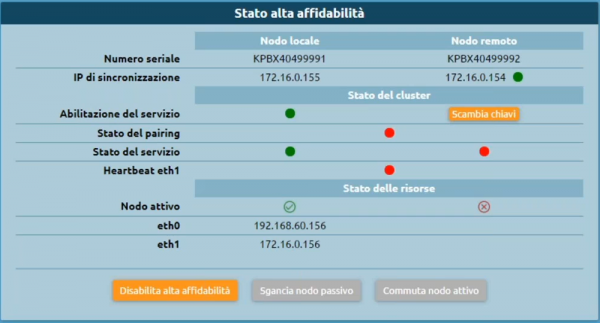
After saving the configuration, we are on the High Availability Status page where we can view: | |||
* | * The nodes with their respective serial numbers and synchronization IPs | ||
* | * The cluster status with the service enable, the pairing status, the service status, the heartbeat | ||
* | * The status of the resources with the active node | ||
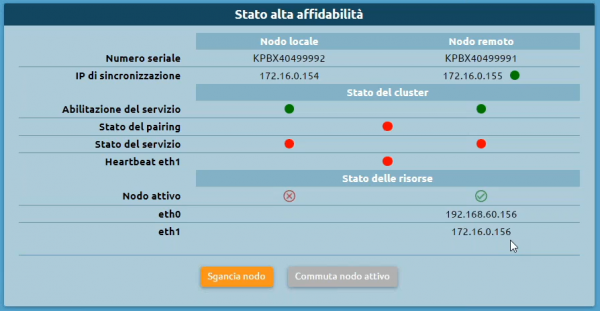
* | * The cluster status - "pair" option: we will hook the secondary node and we will be able to see the status panel in passive mode: | ||
[[File:Stato AA 2.png|600px|centro]] | [[File:Stato AA 2.png|600px|centro]] | ||
===High availability passive node status=== | |||
* '''Unhook node''': disable high availability, thus leaving the cluster degraded and the resource running on the active node | |||
* ''' | * '''Switch active node''': force resource acquisition | ||
* ''' | |||
===High availability active node status=== | |||
[[File:Stato AA 3.png|600px|centro]] | [[File:Stato AA 3.png|600px|centro]] | ||
* '''Disable High Reliability''': turns it off on both nodes | |||
* ''' | * '''Unhook passive node''' | ||
* ''' | * '''Switch active node''': force resource switching on the other node | ||
* ''' | |||
Versione attuale delle 14:23, 20 set 2022
Return to AdminGuide:Service
Description
High availability aims to increase the performance of the VoIP system by bringing together two physical nodes or two virtual machines that work together in active/passive mode. Only one of the two PBXs is active in a specific moment, while the other is on standby and is ready to take over call service when the passive node fails. There is no retention of calls in progress during transferring resources from one node to the other By design, the failure that a high-availability system intends to handle is a complete shutdown of the active node's functionality at that time:
- natively there is no case of monitoring service if it is not actiive, as instead happens in other redundancy mechanisms where the node is considered degraded, even if one of the services is not active
- unpleasant episodes can happen if the two nodes that are part of the cluster, lose their sight of each other, because each of them is convinced to be the only one and therefore activates, causing a "split brain" situation
The High availability panel is accesible only to the admin or in case of Multitenant machine, to the PBX Admin.
Configuration
We have to go to Settings > High Availability Status This takes us to the High Availability Configuration page.
You can change system's status as "Enabled as Coordinator" or "Enabled". For example, we can choose "Enabled as Coordinator" for a node to keep as coordinator and select (from another browser tab) another node as "Enabled", which will act as a secondary and receive the configuration from the other node.
Network settings
For a complete configuration, you need to go to Settings > Network settings and check that two network interfaces are configured for high availability, checking their own IP address. The two interfaces are connected to the same virtual switch that has no public interfacing. It has a single DNS configured and a route.
High Availability Configuration
Service Configuration (Abilitato come coordinatore)
- S/N remote node: it's the serial number, the first communication between the two exchanges (coordinator and secondary node) works with an interactive SSH session, in which you have to insert user and password for autentication. The password is calculated from the serial number of the machine. So the coordinator node needs to know the serial number of the other node to get the password to connect with and provide the necessary commands
- Enabled: you can choose which service to configure on one or both of them
- Interface: it is possible to see all the network interfaces present on the machine
- Local IP Address: you can see which is the local IP address
- Remote IP Address: you can view the remote IP address.
- Resource IP Address: it's the IP address that will be acquired and shared on a given interface
- Ping group: you can insert the IP addresses separated by spaces and they will be the nodes that each of the two will ping periodically to check which one sees more of them
- Synchronization interface: you can insert a chosen interface that will be used for synchronization of data and logs between the two nodes (e.g. eth1)
- Default active node: you can choose which of the two nodes should acquire the default resource in case of indecision.
Advanced settings
- Timeout keepalive - warning threshold (sec.): this is a threshold after which a warning is generated (at the moment only in the logs)
- Timeout keepalive - out of service (sec.): this value defines after how long the node is not communicating with the other node, it must be assumed that it is inactive, and therefore if the other node may acquire resources
- Initialization timeout (sec.): this value guarantees a specific number of seconds before deciding to acquire the resources (if there is already an active node). The higher the value, the more time the machine will take at startup to become operational because both nodes wait for this time
By pressing "Save and start service" you can save the setting to the database and the high availability can start.
High Availability Status
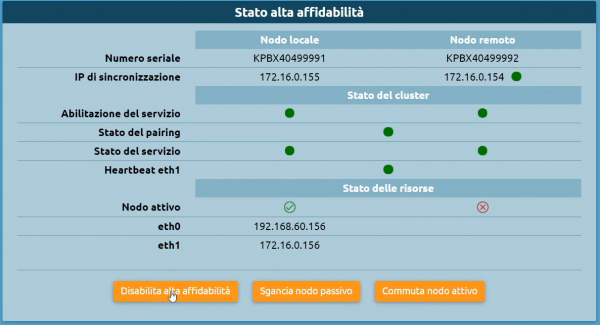
After saving the configuration, we are on the High Availability Status page where we can view:
- The nodes with their respective serial numbers and synchronization IPs
- The cluster status with the service enable, the pairing status, the service status, the heartbeat
- The status of the resources with the active node
- The cluster status - "pair" option: we will hook the secondary node and we will be able to see the status panel in passive mode:
High availability passive node status
- Unhook node: disable high availability, thus leaving the cluster degraded and the resource running on the active node
- Switch active node: force resource acquisition
High availability active node status
- Disable High Reliability: turns it off on both nodes
- Unhook passive node
- Switch active node: force resource switching on the other node

