Differenze tra le versioni di "AdminGuide:Service:Phonebook/en"
(Creata pagina con "Return to AdminGuide:Service") |
(Creata pagina con "==Description==") |
||
| Riga 18: | Riga 18: | ||
[[File:Rubrica interni.png|centro|800px]] | [[File:Rubrica interni.png|centro|800px]] | ||
===Shared phonebook=== | |||
The shared phonebook contains the contacts visible to all extensions in the control center. | |||
By logging in with a non-admin user, but associated with an extension, you can have the management of a personal phonebook via web interface and via CTI client. | |||
[[File:Rubrica condivisa.JPG|centro|800px]] | [[File:Rubrica condivisa.JPG|centro|800px]] | ||
<br> | <br> | ||
The shared phonebook is populated by the admin or other users by proxy and contains a number of '''tabs''' that can be added manually or imported from EXCEL files. | |||
<br> | <br> | ||
[[File:Aggiungi nuova scheda.JPG|destra|400px]] | [[File:Aggiungi nuova scheda.JPG|destra|400px]] | ||
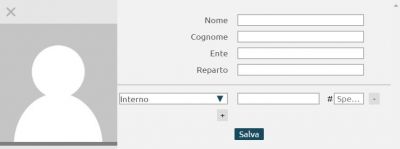
Through '''Add New Card'''', a contact can be added manually by entering: | |||
* ''' | * '''First name'''' | ||
* ''' | * '''Last Name'''' | ||
* ''' | * '''Organization'''' | ||
* ''' | * '''Organizational unit''''' | ||
You can choose as contact information: the extension, home, work, mobile, work mobile, fax, e-mail. | |||
The option '''Phonebook''' allows you to: | |||
* '''Replace the current phonebook with the imported one''': if this option is not checked, the existing phonebook is integrated with the new one | |||
* ''' | * '''Choose whether speed dials in the file include the prefix''' (of the numbering plan). | ||
* ''' | The phonebook can be exported via EXCEL file. | ||
==LDAP settings== | |||
[[File:Impostazioni LDAP.png|destra|400px]] | [[File:Impostazioni LDAP.png|destra|400px]] | ||
To reach the LDAP settings panel, click on "Phonebook > LDAP Settings" | |||
<div lang="it" dir="ltr" class="mw-content-ltr"> | <div lang="it" dir="ltr" class="mw-content-ltr"> | ||
Versione delle 15:14, 20 mag 2022
Return to AdminGuide:Service
Description
The phonebook allows the display of contacts in the local phonebook and the shared phonebook.
Configuration
Local phonebook
The local phonebook is populated by extensions that have a particular configuration that is the active "Show in local phonebook" parameter. In the extension settings there is a way to make the presence of the extension visible in the LDAP address book.
- According to LDAP publishing rule: exposes the extension number with manipulation to convert it to a geographic number.
- Presenting the telephone number below: exposes the extension number with a specified number
- According to the LDAP publication rule applied to the extension below: assigns a dummy extension and the masking specified in the LDAP panel is applied
The shared phonebook contains the contacts visible to all extensions in the control center. By logging in with a non-admin user, but associated with an extension, you can have the management of a personal phonebook via web interface and via CTI client.
The shared phonebook is populated by the admin or other users by proxy and contains a number of tabs that can be added manually or imported from EXCEL files.
Through Add New Card', a contact can be added manually by entering:
- First name'
- Last Name'
- Organization'
- Organizational unit
You can choose as contact information: the extension, home, work, mobile, work mobile, fax, e-mail.
The option Phonebook allows you to:
- Replace the current phonebook with the imported one: if this option is not checked, the existing phonebook is integrated with the new one
- Choose whether speed dials in the file include the prefix (of the numbering plan).
The phonebook can be exported via EXCEL file.
LDAP settings
To reach the LDAP settings panel, click on "Phonebook > LDAP Settings"
Interni
È possibile abilitare come funzione globale l’esportazione della rubrica degli interni su LDAP.
- Albero di pubblicazione degli interni: è visualizzato l’albero
- Abilita pubblicazione degli interni: si può trovare consultabile via LDAP la rubrica degli interni
- Numero di cifre da rimuovere in testa dagli interni: regola standard di pubblicazione degli interni che serve nel caso si volessero esporre i numeri di interno non con il numero del derivato, ma con quello completo geografico
- Prefisso da aggiungere agli interni
Contatti di Sistema
- Albero di pubblicazione dei contatti di sistema: è visualizzato l’albero
- Abilita pubblicazione dei contatti di sistema
- Aggiungi il prefisso per le chiamate uscenti: modifica i numeri che vengono pubblicati su LDAP per aggiungere il prefisso 0 di impegno della linea esterna, ad eccezione dei contatti marcati come tipo interno. Così è possibile trovare direttamente il numero comprensivo dello “0” pronto per essere chiamato.


