Differenze tra le versioni di "AdminGuide:Service:IVR/en"
(Creata pagina con "After configuring and saving the second menu you can find both on the main screen. centro|1000px") |
|||
| Riga 70: | Riga 70: | ||
[[File:Permetti digitazione.png|centro|300px]] | [[File:Permetti digitazione.png|centro|300px]] | ||
== IVR submenu (in cascade) == | |||
To create a cascading IVR menu have to create another menu by proceeding in the same way. Before doing that, save the previously created IVR menu using the Save button. After that, you will be in the main screen. To add another menu, press Add IVR Menu. | |||
[[File:Menu cascata.png|centro|1000px]] | |||
After configuring and saving the second menu you can find both on the main screen. | |||
[[File:Vista Menu Cascata.png|centro|1000px]] | [[File:Vista Menu Cascata.png|centro|1000px]] | ||
Then, editing the Main Menu you can select the option forward to: IVR Menu and choose the secondary menu in the last box on the right. | |||
[[File:Menusecondario.png|centro|700px]] | [[File:Menusecondario.png|centro|700px]] | ||
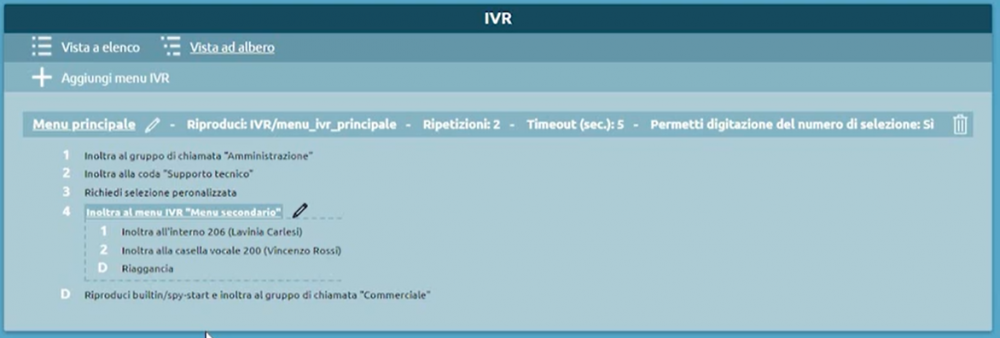
Back on the main page you can distinctly see the connection between the two menus by selecting the Tree View. | |||
[[File:Vista ad albero.png|centro|1000px]] | [[File:Vista ad albero.png|centro|1000px]] | ||
Versione delle 16:43, 15 feb 2022
Return to AdminGuide:Service
Description
The Interactive Voice Response allows the caller to be routed to a specific service according to the DTMF input.
It’s possible to create an arbitrary number of IVR menu that can be drop-down menu or indipendent menu.
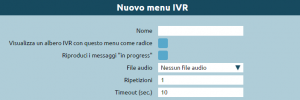
- Name: you can fill this field with the IVR name you’ve chosen
- If you want to create drop-down menus you can choose to Display the IVR tree visualization with the current menu as tree root.
- The “Play messages “in progress”” checkbox plays the free audio message (triggered from SIP 183 Session Progress) before the dispatch of SIP message 200 OK that would trigger the beginning of the calling and the billing as a result. This feature is recommended for companies that have a toll-free number associated with the IVR, because the company itself pays the cost of the call and in this way can save precious seconds for each call received. The availability to accept the Session Progress SIP 183 message depends on the operator to which the central unit is connected and normally has a maximum duration of 59 seconds.
- The Sound File selection allows you to select a pre-recorded track that contains various options the client can choose using the numeric keypad.
- The “Repetitions” field can be filled with the number of time the audio file will be executed. You can’t choose 0 because that means the file audio won’t be executed.
- Timeout (sec.) indicates the selection wait at the end of the audio message. The system is on hold for the indicated number of seconds before performing a second repetition (if there is any) or triggering the default action (field below).
Default Action
The default action is preset as “go to: Hangup” but there are other options in the drop-down menu. You can choose to play an audio file in case the user didn’t select anything so the user can notice the error and be forwarded on another list options.
Selections
In the Selections part you can associate the number typed by the user to a specific option in the drop-down menu. Some examples:
- Hang-up: the call is over after the audio repetitions.
- External number: the call is routed to an external number that can be a cell phone or a number that doesn’t belong to the PBX switchboard.
You can choose the CLID that is used to identify the phone number of the calling user.
- Extension: the call is transferred to an extension number that you can chose using the box on the right.
- Callgroup: the call can be reached from more than one extension, the available one can answer an inbound call.
For more informations visit the Ring Groups page.
- Callgroup (bypass checktime): time control on the call groups can be ignored using this option.
- Queue: incoming calls don’t engage one or more destinations, but are placed in a queue. The call is removed from the queue when there are operators available to serve the customer.
For more informations visit the ACD Service page.
- Queue (bypass checktime): time control on the queues can be ignored using this option.
- Checktime: is a way to manage the routing of calls on a time/manual basis. The time-based process consists of defining time slots that are detected in order: if current date and time match with one of these, the call is forwarded, otherwise a general action is performed. The manual mode consists in on/off switches that can be controlled thanks to a code typed from telephone and/or BLF key.
For more informations visit the Checktime page.
- IVR menu: allows you to select an existing IVR menu that will be linked to the current one, this creates a cascading menu.
- Voicemail: allows a user to receive voice messages when they’re unable to answer a call (if busy or unavailable).
For more informations visit the Voicemail page.
- MeetMe Room: it’s possible to log into an audio conference service in which internal or external people are connected to.
You can choose to ask the room number (PIN) or to directly send the user to the room.
- Dynamic Routing: this service allows to manage the call whether by invoking an external web service (like the original application) or by finding the parameters on a XSL/CSV file loaded on the PBX.
For more informations visit the Dynamic Routing page.
- FAX instance: allows you to select a FAX instance that is considered a physical FAX that can be accessed by one or more users.
For more informations visit the Fax Module page.
- Numbering plan – custom selection: allows you to insert a selection that has already been configured in the numbering plan.
- Numbering plan – ask for selection: an audio file that asks for selection will be played. This allows the caller to choose which extension wants to reach. The possibilities are listed in the audio file.
- Allow digit exten enabled: allows the caller to type a number - if he already knows it - without listen to the possibililities. The number can be composed of several digits, so the IVR service will wait until the user finish, to avoid directing the customer to the wrong selection.
To create a cascading IVR menu have to create another menu by proceeding in the same way. Before doing that, save the previously created IVR menu using the Save button. After that, you will be in the main screen. To add another menu, press Add IVR Menu.
After configuring and saving the second menu you can find both on the main screen.
Then, editing the Main Menu you can select the option forward to: IVR Menu and choose the secondary menu in the last box on the right.
Back on the main page you can distinctly see the connection between the two menus by selecting the Tree View.


